Tuesday 29 May 2018

Kitbashing gadgets 2

You may recall that I was working on this item of equipment for my science lab diorama model:


I have since added more knobs and toggle switches (thanks to good egg Bob Aucutt - lovely chap, produces a range of action figures in retro spacesuits and other screen-inspired costumes: Bobs Toy Box Studios LLC)

I still have some small details to add, but decided to spray the wireless set as these extra details are small and won't be painted green anyway.
I opted for Tamiya's British Green over Humbrol Grass Green to give a fairly non-descript colour which looks sort of military.  It'll be aged and scuffed up a bit with several areas repainted or covered in Bare Metal Foil for variety.


Looks a bit like a glutinous mass of green at the moment but it'll take shape as more details are painted in.


I added 'YUTANI' from vinyl lettering and will pick it out with wear and tear... why Yutani?  I just like the idea of visual references to random SF concepts...


More to come :) 

Monday 28 May 2018

Painting a Head

A few years ago I repainted a Big Chief Studios 4th Doctor head for myself as I felt it was a very poor representation of the Doctor as played by Tom Baker.  The eyes boggled too much and they gave him rather clownish 'hobo' stubble/five o'clock shadow... why?  Bit strange.
Anyway, I repainted the head (my first) and it turned out okay.  I'm no Darren Carnall (Facebook page) but it looked fine to me.
I painted a couple of others with varying degrees of success.
I was later asked to repaint a smiling head for the same figure which seemed okay, although it received some criticism from some quarters.
I don't fool myself, when it comes to painting heads I am strictly a hobby painter and that's it... even so I still have the odd person asking for a repaint.  I normally say no as I can't guarantee it'll turn out okay, but recently I buckled and agreed to repaint another 4th Doctor head.

The head as is comes like this:

This image is from Michael Crawford's review of the figure... I don't have a 'before' photo sadly.
http://www.mwctoys.com/images2/review_drwho_3.jpg

So, biting the bullet I mixed up a basic skin tone and covered the head (minus the hair).


As you can see the underlying sculpt is clearly very good and captures Tom Baker's likeness to a T.

I then applied another layer in a mix of colours with some general shading - I did this to allow for some skin texture as PVC heads seem rather smooth... I may have overdone it but the final results look okay.


Next came the final skin tone... more shading and some lighter tones to add a bit more life.  At this point I also painted in Tom's 1970s Noddy Holder style sideburns...


Finally I touched in the lips, added some more colour to the skin and painted the eyes... the latter could have been neater but my eyes aren't what they used to be...


I also tried it out with my own figure's hair to see how it looked... and it looks okay to me.


All I need to do now is touch in the eyebrows and that's it.  The chap I painted it for seems happy enough with it, and that's good enough for me.

If I can do it I think any competent model maker with experience in painting larger figures could do it... with a likeness this good painting it is a pleasurable experience.


Thursday 24 May 2018

Caverns and Tunnels

My aim is to try and recreate in miniature what I saw on TV and in films when I was a lad: budgets were low and imagination was paramount.  Up to now it's mostly been about building retro technology and a multi-use corridor section... however sometimes you come across something that just shouts YES!! at you.
Such was the case when I came across something by accident - fish tank environment backgrounds... these are Chinese made moulded polystyrene sheets with rock texture and basic weathering with a dry brush.  I took a punt and ordered a couple of dark rock walls.

The sheets arrived from a UK seller within a week and I was bowled over by the size - they're roughly A2 size (about the size of a flip-chart sheet)... but as light as a feather.

The surface texture is nice and deep, but there are annoying ejector pin marks all over the place - these can be removed in Photoshop or GIMP (I bought these for photos rather than permanent display).


These two photos show the texture and ejector pin marks...


When used for photography they can produce spectacular results...


I'm happy that my habit of thinking outside the box paid off as I don't think I could have taken photos like these with a home made section of cavern or tunnel wall.
I shall be checking out more fish tank/aquarium stuff in the future...

Thursday 10 May 2018

Fun with leather

I recently had the Redman Toys "Good Cowboy" (The Man With No Name) delivered and while this is an excellent figure the pleather saddlebags and pseudo suede gunbelt and holster.
The gunbelt could be improved but I will have a go at weathering it first, but the saddlebags are terrible. 
They are a thin fabric material covered with an even thinner skin of PVC 'leather'... which flakes off as soon as you look at it too hard.  I decided to have a go at making a replacement.

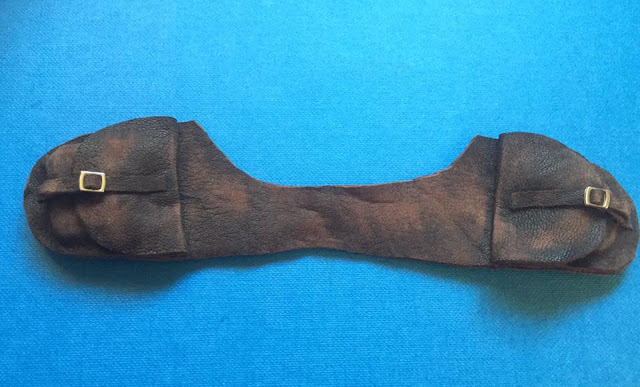
I ordered some thin dark leather from the internet and once it arrived I traced the original on the reverse twice to have a front and back to the saddlebags.  I used fabric contact glue to fix these parts together.  I need to stitch the edges for a more professional look but they are okay at the moment.

For the bags I just traced around the new leather piece and then glued these to both ends.  These will also need to have stitches around the edge.
The flaps were made in the same way with fastening straps cut from thin strips of the leather.  I used the buckles from the original bags.

To make the thing look worn and used I scuffed it up with my sanding block.  Once the stitches are in I will weather it with powders and filters for that dusty look.

This is the part as it stands at the moment...
Technically it should be in two halves joined in the middle, but I'm happy with the way it looks.


I filled the bags with car tyre balancing weights... it needs to hang properly and it can only do that with some weight to it.